 Save
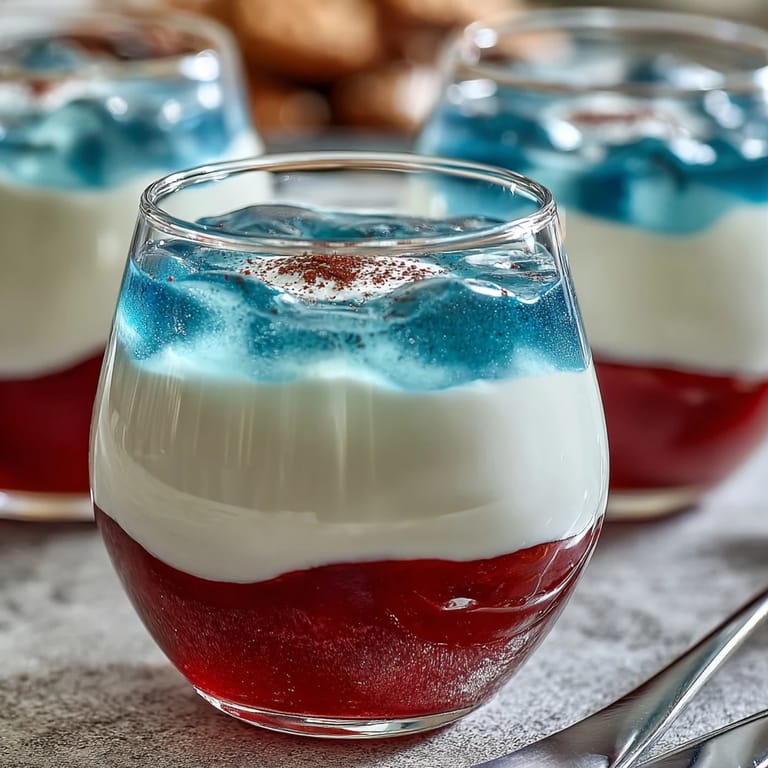
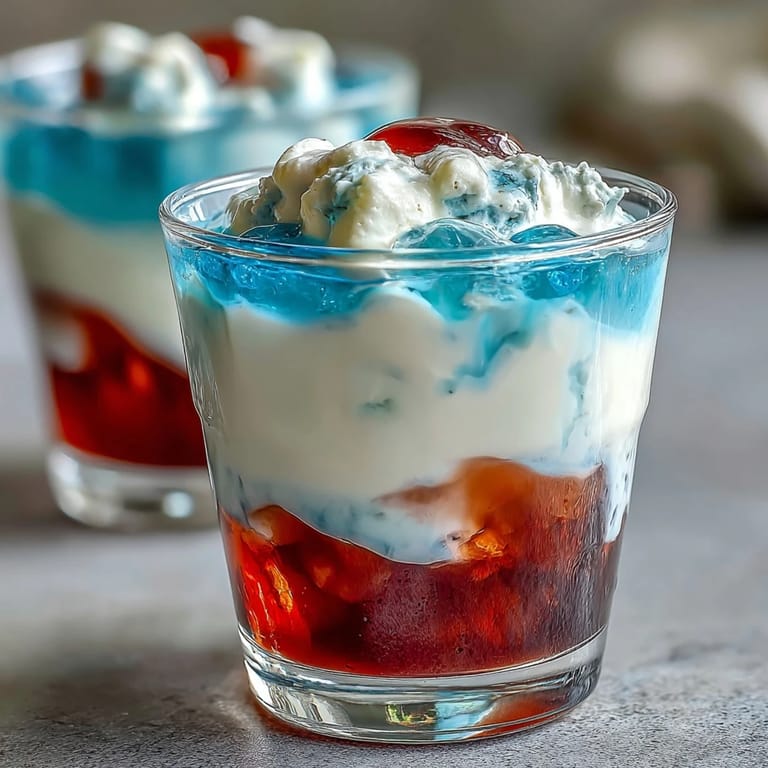
Save My daughter came home from school buzzing about a Fourth of July party at her friend's house, and I knew exactly what would make her feel like the coolest kid there: these jewel-toned jello cups that look like edible fireworks. The first time I layered them, I was honestly nervous the stripes would blur together into murky brown, but when I pulled those cups from the fridge and held them up to the light, the three perfect bands of red, white, and blue staring back at me felt like actual magic. Now they're my go-to when I need something that feels fancy but doesn't require fancy skills.
I made these for a potluck once when everyone else brought cookies and casseroles, and watching people's faces light up when they realized the layers didn't turn to mud was worth every minute spent waiting for gelatin to set. One guest even asked me for the recipe, and when I told her it was jello, she seemed almost disappointed that something so stunning could be so straightforward.
Ingredients
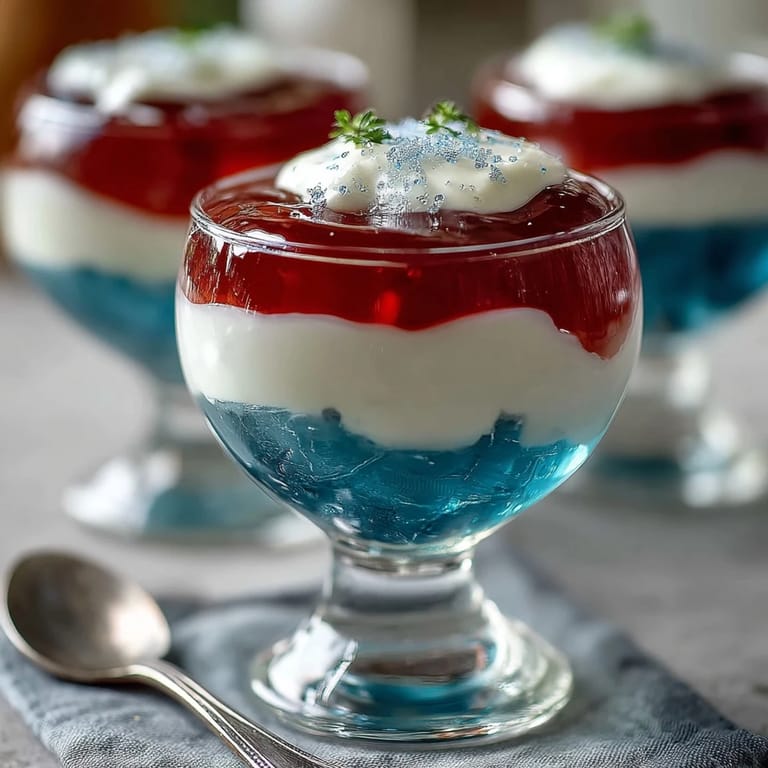
- Red Jello (strawberry or cherry, 3 oz box): This is your foundation layer, and the flavor matters less than making sure the color is vibrant; cherry tends to be deeper and more jewel-like than strawberry.
- Boiling water (1 cup for red layer): You need it hot enough to fully dissolve the powder without any grainy bits that'll ruin your pretty layers.
- Cold water (1/2 cup for red layer): This stops the jello from setting too fast and gives you a window to pour it into cups.
- Unflavored gelatin (1 envelope): This is the secret to the creamy white middle layer; it's different from flavored jello and creates that custard-like texture.
- Cold water (1/2 cup for white layer): You'll bloom the gelatin in this, which means letting it sit and absorb the liquid before adding heat.
- Boiling water (1/2 cup for white layer): Dissolves the bloomed gelatin so it combines smoothly with the condensed milk.
- Sweetened condensed milk (1 cup): This makes the white layer creamy and opaque, giving you that actual contrast between layers instead of just different shades of transparency.
- Blue Jello (blue raspberry, 3 oz box): The finale layer, and blue raspberry is the traditional choice because it stays true blue without turning purple or muddy.
- Boiling water (1 cup for blue layer): Same deal as the red: you need it hot to dissolve everything completely.
- Cold water (1/2 cup for blue layer): Tempers the temperature so you don't accidentally melt your white layer when pouring.
- Whipped cream and fresh berries (optional garnish): These turn a fun dessert into something that looks intentional, like you planned this for hours instead of throwing it together.
Tired of Takeout? 🥡
Get 10 meals you can make faster than delivery arrives. Seriously.
One email. No spam. Unsubscribe anytime.
Instructions
- Set up your cup situation:
- Grab 8 clear cups (those 6 to 8 ounce ones work perfectly) and line them up where you can see them; I always use a muffin tin to keep cups at a slight angle during the first chill, which makes pouring the next layer feel less stressful.
- Make the red layer sing:
- Dissolve the red jello in 1 cup of boiling water by stirring it for about 2 minutes until there's absolutely no powder floating around, then add 1/2 cup cold water. Divide this evenly among your cups (about 2 tablespoons each) and slide them into the fridge at that slight angle for 45 to 60 minutes, until the jello is set but still has a tiny jiggle when you nudge it.
- Whip up the white layer magic:
- In a clean bowl, sprinkle the unflavored gelatin over 1/2 cup cold water and let it sit for 5 minutes without stirring; this blooming step is what prevents lumps. Pour in 1/2 cup boiling water and stir gently until the gelatin dissolves completely, then stir in the sweetened condensed milk, which will turn the mixture pale and opaque. Let it cool to room temperature (this is important because pouring hot liquid on set jello will melt it), about 10 to 15 minutes.
- Layer number two, nice and gentle:
- Once your red layer is properly set, carefully pour the white mixture over it (still about 2 tablespoons per cup), then stand those cups upright in the fridge and chill for another 45 to 60 minutes until firm. You'll know it's ready when you jiggle the cup and the white layer doesn't move independently of the cup.
- Prepare the blue finale:
- Dissolve the blue jello in 1 cup boiling water, stirring well, then add 1/2 cup cold water. Let it cool to room temperature before you go near those cups; warm jello and a set white layer are not friends.
- Crown it with blue:
- Pour the cooled blue jello gently over the white layer (about 2 tablespoons per cup again), and refrigerate upright for at least 2 hours, preferably overnight, until everything is completely set and those layers feel solid.
- The finishing touch:
- Right before serving, you can top each cup with a dollop of whipped cream and a scatter of fresh blueberries and strawberries if you're feeling fancy.
 Save
Save My daughter brought her whole friend group over after that Fourth of July party, and they sat at the kitchen table eating these jello cups like they were the most precious thing they'd ever been served. Watching them hold the cups up to the light and marvel at the layers, comparing which one's striped better, reminded me that sometimes the simplest desserts create the biggest moments.
Temperature Timing Is Everything
The reason this recipe works is honestly about respecting how gelatin behaves at different temperatures. I used to pour hot liquids right onto set layers and wonder why everything turned to soup, but once I started cooling each mixture before pouring, the layers stayed where I put them. It feels finicky at first, but it's actually just chemistry working in your favor.
Flavor Swaps That Actually Work
While the traditional red, white, and blue is iconic, I've experimented with lime instead of blue and lemon instead of red, and both turned out stunning in totally different ways. The white condensed milk layer stays the same, but the flavor combinations let you make these for other occasions: Christmas with red and green, Valentine's with extra red, or just because you're craving something bright and fruity. The key is picking jello flavors with actual personality, not the ones that taste vaguely chemical.
Make-Ahead Magic and Storage
These cups are genuinely one of the best desserts to prepare when you're hosting, because you can make them the night before and they actually sit better in the fridge after they've had time to fully set and chill completely. Once they're done, cover them loosely with plastic wrap so they don't absorb any fridge smells, and they'll stay perfect for up to 3 days. If you're transporting them anywhere, leave them in their cups and keep them cold in a cooler with ice packs; trying to transport unmolded jello is an exercise in heartbreak.
- Assemble these the day before your party to free up your day for everything else that needs doing.
- The white layer can look slightly cloudy when it's chilling, but it clears up beautifully once it's fully set and cold.
- If you're worried about them sliding around in the car, pack them in a sturdy box with some crumpled parchment paper to keep them from shifting.
 Save
Save These jello cups have become my answer to the question of what to bring when I want something that feels special but doesn't require me to stress in the kitchen. They're patriotic without being heavy-handed, elegant without being complicated, and genuinely delicious in a way that reminds you why simple desserts never go out of style.
Recipe FAQs
- → How do you achieve sharp layers in the jello cups?
Allow each layer to fully set in the refrigerator before adding the next to maintain distinct, clean layers.
- → Can I substitute ingredients for dietary preferences?
Yes, use coconut milk and sugar instead of sweetened condensed milk to make a dairy-free version.
- → What is the best method to set the cups at an angle?
Place the cups in a muffin tin or similar holder set at a slight angle to create angled layers easily.
- → How long does the total chilling process take?
The entire layered dessert requires about 4 hours of chilling to fully set all layers before serving.
- → Are these layered cups gluten-free?
Yes, but verify that the gelatin and condensed milk products do not contain hidden gluten ingredients.